Table of Contents
ToggleInstalling a Blink Outdoor camera is one of the simplest smart home upgrades you can tackle yourself, no electrician or complicated wiring required. Whether you’re adding eyes to your front porch, driveway, or backyard, the process takes about 30 minutes once you’ve picked your spot. This guide walks you through every step: gathering your tools and materials, choosing the right mounting location, securing the hardware, and getting the camera live on your WiFi network. By the end, you’ll have a functioning outdoor security camera that sends alerts to your phone and records what matters most.
Key Takeaways
- Blink Outdoor camera installation requires no electrician and takes approximately 30 minutes with basic tools like a drill, level, and measuring tape.
- Mount your camera 8–10 feet high at a 15–25 degree downward angle, within 20–30 feet of your WiFi router, to balance field of view with face and license plate recognition.
- Use heavy-duty anchors rated for your specific wall surface (drywall, brick, stucco, or vinyl siding) and apply weatherproof caulk around the bracket to prevent water damage.
- Connect to your 2.4 GHz WiFi network (not 5 GHz) through the Blink Home app using the QR code or setup code on the camera for reliable signal and stability.
- Optimize performance by setting 1080p HD resolution, creating custom motion detection zones to reduce false alerts, and checking battery levels—lithium AAs typically last 2+ years depending on recording frequency.
What You’ll Need Before Getting Started
Before you climb a ladder or drill a hole, gather everything in one spot. A missing piece or wrong tool halfway through frustrates fast.
Materials:
- Blink Outdoor camera (any generation: 2nd or 3rd gen are current standards)
- AA batteries (2 per camera: Blink recommends lithium for outdoor use and longer life)
- Wall anchors or fasteners rated for your surface (drywall, brick, vinyl siding, stucco, each needs different anchors)
- Weatherproof silicone caulk or sealant (optional but smart: prevents water seeping around the bracket)
Tools:
- Cordless drill-driver with a small drill bit (1/8″ works for pilot holes)
- Level (a 2-foot spirit level is fine)
- Measuring tape
- Pencil
- Screwdriver (usually included with the camera mount)
- Safety glasses (dust and small particles fly when drilling)
Before Installation:
Confirm your home WiFi network is strong where you plan to mount the camera. A WiFi extender or mesh system may help if your signal drops near the installation spot. Check your smartphone has the Blink Home app installed from your device’s app store. Make sure your Blink account is set up and you’re logged in, you’ll need this during the setup process.
Choosing The Right Location For Your Camera
Location determines everything: image quality, battery life, and whether the camera actually captures what you need.
Coverage and Angle:
Mount the camera 8–10 feet high on your wall or soffit. This height balances a wide field of view (roughly 110 degrees) with enough detail to recognize faces and license plates. Aim the lens downward at a 15–25 degree angle so you cover entry points, doors, gates, driveways, without pointing straight into the sky or ground.
WiFi Signal Strength:
Blink cameras work best within 20–30 feet of your router or WiFi extender. If you’re at the edge of range, expect occasional disconnects. Test signal strength by standing at your planned location with your phone and checking WiFi bars. Anything below two bars usually means trouble.
Weather and Sun:
Position the camera where rain and snow won’t collect on the lens, but avoid mounting it in direct sunlight all day, heat degrades the battery faster. Overhanging eaves, covered porches, and exterior soffit corners are ideal. Direct sun exposure can cut battery life by 20–30% in hot climates.
Privacy and Neighbors:
Point the camera at your own property. Aim away from neighbors’ windows or yards to avoid legal or social friction. Most jurisdictions allow residential security cameras on your own home, but pointing into a neighbor’s space can trigger privacy complaints or legal issues.
Installing The Camera Hardware
Mounting And Securing The Device
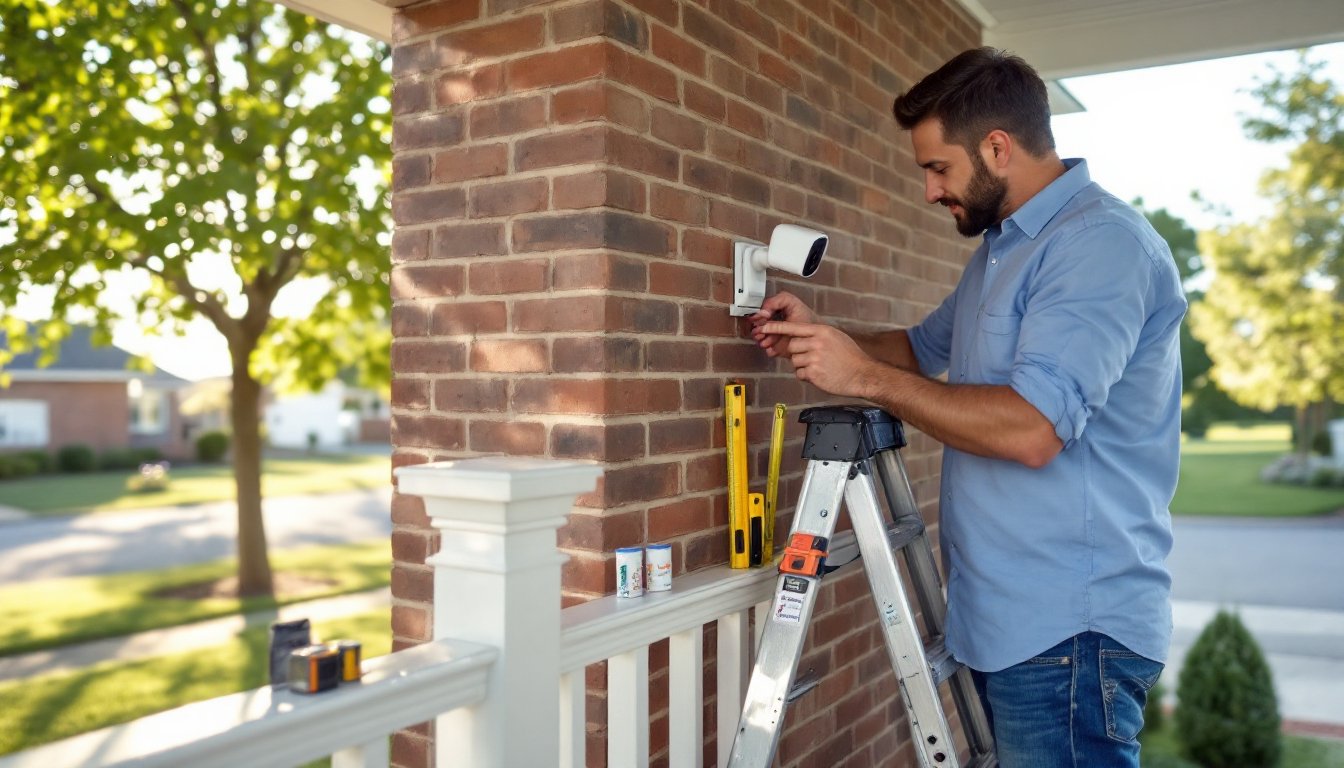
Step 1: Mark the Mounting Point
Using your measuring tape and pencil, mark two holes on the wall where the bracket will attach. The Blink bracket typically has two screw holes spaced about 4 inches apart. Use your level to make sure the bracket will sit straight, a tilted camera looks sloppy and may miss key areas.
Step 2: Drill Pilot Holes
Wear safety glasses. Drill a small pilot hole (1/8″ diameter) into each marked spot. This prevents the wall from cracking and makes inserting fasteners easier. On brick or concrete, use a masonry bit: on drywall or siding, a standard bit works fine. If drilling into brick or stucco, switch to a masonry anchor rated for outdoor use.
Step 3: Install Wall Anchors or Fasteners
For drywall or vinyl siding, use heavy-duty plastic anchors or toggle bolts, they hold far better than standard anchors and support the camera’s weight plus wind load. For brick, stucco, or concrete, use masonry fasteners with a drill-in or screw-in anchor. Insert anchors flush with the wall surface.
Step 4: Mount the Bracket
Slide the mounting bracket over the anchors and secure both screws. Hand-tighten first, then use your drill-driver to snug them down, firm but not gorilla-tight. Over-tightening strips threads and can crack plastic brackets.
Step 5: Attach the Camera
Clip or screw the Blink camera body onto the bracket according to your model’s design. Most cameras have a quick-release or screw-pin connection. Make sure it’s seated fully and won’t rattle in the wind.
Step 6: Apply Weatherproofing (Optional but Recommended)
Run a bead of weatherproof silicone sealant around the bracket base where it meets the wall. This prevents water from pooling under the bracket and corroding fasteners or running inside the wall. Let it cure per the sealant’s instructions (usually 24 hours) before running the camera.
Setting Up The App And Connecting To WiFi
Once the hardware is secure and the batteries are installed, it’s time to get your camera talking to your phone.
Step 1: Open the Blink App and Add Device
Launch the Blink Home app on your smartphone. Sign in with your Blink account. Tap the ‘+’ button or ‘Add Device’ option and select Outdoor Camera from the list.
Step 2: Scan or Enter the Setup Code
The app will prompt you to scan the QR code on the camera or its packaging. If that doesn’t work, you can manually enter the 8-digit setup code printed on the device. This code links the camera to your account.
Step 3: Connect to Your WiFi Network
The app will ask you to select your home WiFi network and enter your password. Make sure you’re entering the 2.4 GHz network (not 5 GHz). Blink cameras work better on 2.4 GHz for range and stability. Double-check your password, typos are the top setup failure.
Step 4: Name Your Camera
Give it a descriptive name like “Front Porch” or “Driveway.” This makes it easy to identify in your app when you have multiple cameras.
Step 5: Verify Connection
Wait for the LED on the camera to turn steady blue or show a confirmation in the app. Recent guides on Blink camera setup note that this can take 1–2 minutes. If it fails, restart your WiFi router and try again. If you still have trouble, move your phone closer to the camera temporarily to rule out weak signal.
Optimizing Your Camera For Best Performance
Installation is done, but a few tweaks ensure your camera works like it should.
Adjust Video Quality and Resolution
Blink offers different quality modes: lower resolution uses less bandwidth and battery, while higher quality shows more detail. For security purposes, 1080p HD resolution is the sweet spot, clear enough to identify people but not so heavy it drains your battery in weeks. Adjust this in the camera settings within the app.
Set Up Motion Detection Zones
The app lets you draw custom zones where the camera focuses on motion alerts. If your camera points at a busy street or neighbor’s driveway, use zones to ignore traffic and focus only on your property. This cuts down false alerts and saves battery by not recording constant motion.
Enable Notifications
Toggle push notifications so you get alerted when motion is detected. Set notification preferences, do you want alerts for all motion or only during certain hours? Disabling night-time alerts saves battery if you don’t need them.
Battery and Storage
Check your camera’s battery level in the app. Blink reports battery percentage and typically rates lithium AA batteries at 2+ years for outdoor use (depending on recording frequency). Most users replace batteries annually in moderate climates. Enable cloud storage or local storage via a Blink Sync Module if you want footage saved beyond the 24-hour rolling window.
Troubleshooting and Updates
If your camera drops connection periodically, check for firmware updates in the app settings. Blink pushes updates that fix connectivity bugs. If the camera still disconnects, move your WiFi router or add an extender closer to the camera.
Conclusion
A Blink Outdoor camera installation is a straightforward project that pays back in peace of mind. Pick a solid location, secure the mount properly, and spend time on app setup to avoid headaches later. Most homeowners finish in under an hour and can rely on the camera for months without fuss. If you hit snags, professional installers can always help, but honestly, the process is designed for DIYers. Your investment is now live and watching.